Creating a Facebook Page for Business – An A-Z Guide

We’ll begin this blog post with a question: what is the first thing you do when someone refers a business to you and you want to find out more?
You go home and you Google it. Heck, you may even bring out your phone as your friend is making the recommendation and search for it there and then.
You know you’ve done at least once, if not multiple times.
Now, jog your memory back a little. What is the first result that comes up on the search engine results page?
You will likely be shown a website of the business.
If they don’t have a website, you’ll see a link to their Facebook page.
Sometimes, the Facebook page will be on the top position regardless.
You’ll browse through their posts, see if anything sticks out to you. You’ll check out their reviews, see what their consumers have to say about them. And so on…
Now put your customers in that position.
Imagine they whip out their phone and search for your brand and do not come across a page where they can learn all about you.
They won’t waste a second moving past you and onto your competitors who have an online presence on Facebook.
Don’t believe us?
Let us prove it to you.
This is what you will need to know:
- Why a Facebook Business Page is a Must in 2020
- 1. Create a Facebook Business Page.
- What Next?
- 2. Add more information about the business.
- 3. Come up with a Facebook page username.
- 4. Adjust the page settings to your preference.
- 5. Invite people to Like the page.
- 6. Don’t hesitate to reach out for help!
- Most Frequent Queries
- Wrapping it up

Why a Facebook Business Page is a Must in 2020

1.49 billion people are active on Facebook on a daily basis.
eMarketer found that 87.1% of US marketers will make use of the social media platform for marketing purposes this year.
But wait, there’s more.
Do you know how many small businesses there are on Facebook? A whopping 90 million! Can you imagine how many of these are your competitors?
We aren’t trying to intimidate you with these numbers. All we want is for you to understand the importance of having a Facebook page – a digital presence on social media is a must these days!
If you ignore all the signs and stick to your old ways, your competitors will outrun you in no time. Heck, they may already be way ahead.
If you don’t start catching up now, it’ll be too late!
So, without wasting any more time, let’s get right into how to create an attractive, useful Facebook page.
We will walk you through the steps, one by one.
1. Create a Facebook Business Page.
If you are new to marketing on digital platforms, it is perfectly okay to be a little apprehensive about getting started with a new Facebook page.
You might be tired of hearing “create a FB page” from you friends over and over again but actually getting started can be intimidating.
Before you’ve gone through this blog post, of course.
We’re about to show you how to create a page step by step – it’s as easy as eating pie.
Let’s begin!
Step 1:
First of all, go to https://web.facebook.com/pages/creation/.
You will come to a page that looks like this:
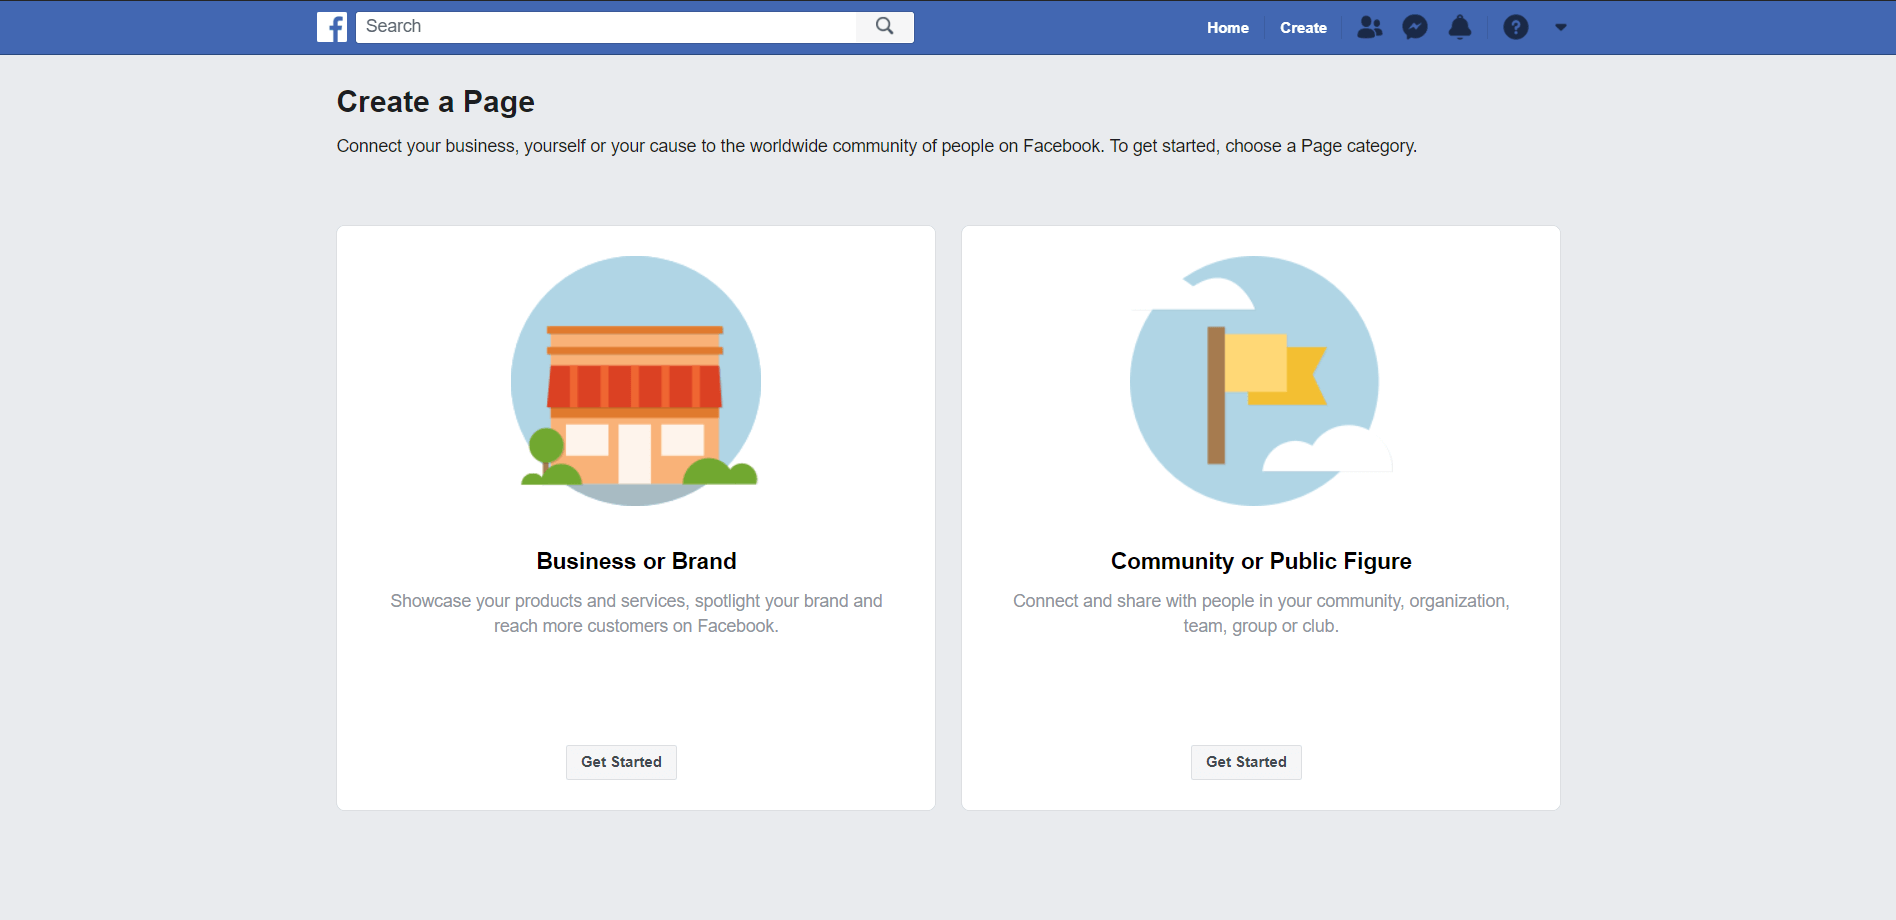
For the purposes of this blog post, we will go with creating a page for your business or your brand.
Step 2:
Next, to create a new Facebook page, click on the Get Started button in the Business or Brand section.
Two fields will appear. Add your Page Name and Category to the fields.
To add the category, add a keyword that is related to your business.
In this example, we pretend we own a shoe store that goes by the name, Shoes for Blues. Keeping in line with this, we typed “shoes” in the Category field and a drop-down menu showed us a list of categories relevant to shoes.
We selected Footwear store, which for us was spot on!
You understand your business best – when you type in a keyword, you will be shown a list of related categories. Just select the category that is most relevant to your business.
Once you do that, two additional fields will pop up where you can add your address, as well as your telephone number.
While it is mandatory for you to add the address – it won’t let you proceed unless you do, we tried! – whether you add a phone number is up to you.
Whether or not you make this information public is also in your hands. You can tick the “Don’t show my address” box to only make the city and state visible to the public.
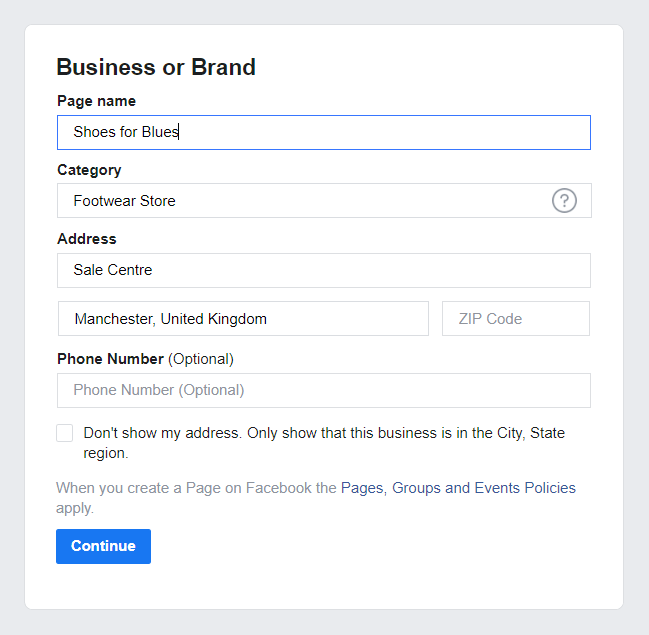
All that is left to do now is click on the Continue button to proceed to the next step.
Note:
Just before you click continue, a statement will inform you that the Pages, Groups and Events policies will become applicable once you create a page.
Giving them a read is a good idea.

Step 3:
You will now be redirected to a screen that asks you to upload a profile picture for your Facebook fanpage.
You can skip this part but only do this is you intend to add an image later – don’t publish your page without a profile picture.
Just click on the Upload a Profile Picture button and select a photo from your device.
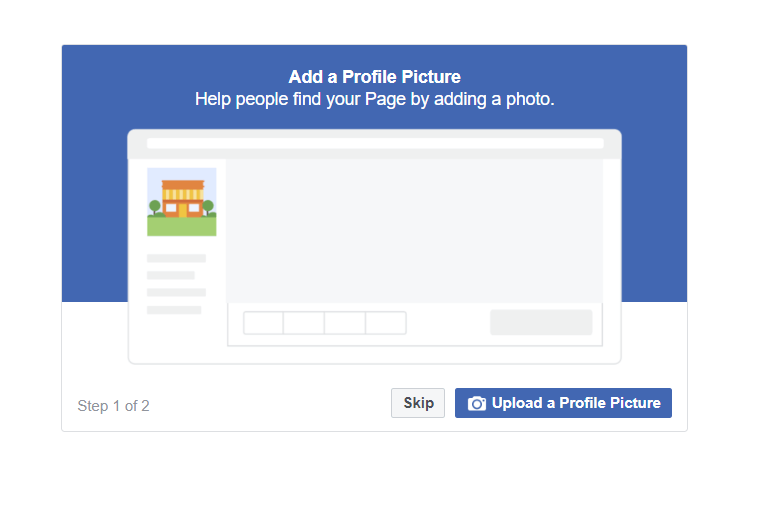
But how do you know which picture to choose for your page?
Here’s something to keep in mind:
The best picture to use here is your business logo. That is something people automatically link to your brand.
Facebook itself provides some tips for choosing a profile photo that will really stand out to your audience. Click here to view these details.
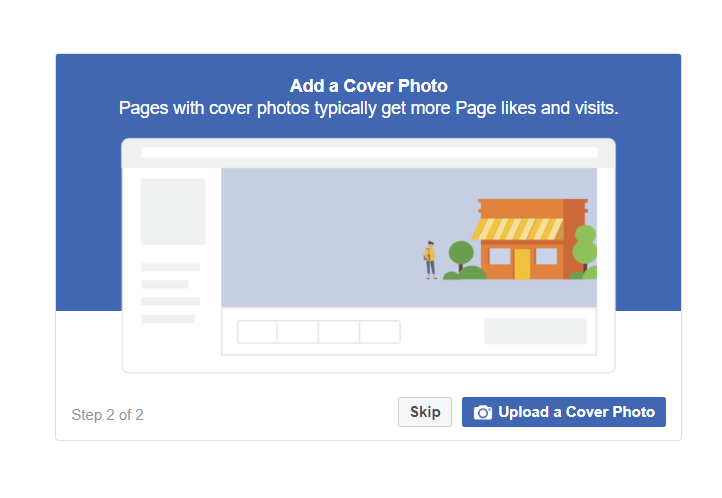
Step 4:
Once you’ve uploaded the profile picture, you will be asked to upload a cover photo. You can use this Facebook banner photo to tell people a little more about your brand – even if it just what your physical store looks like or what your best-selling products are.
Again, you’ll find more information about this from Facebook (in the link we shared in the previous step).
Use the same steps to upload the cover photo.
This step may not seem essential but keep in mind – your Facebook cover page has a direct impact on your Facebook page likes. Do not ignore it!
Before we move on:
We found a great resource to help you choose the right images for your page. Click on the link below and read all about it:
How to Make Your Facebook Business Profile Imagery Stand Out
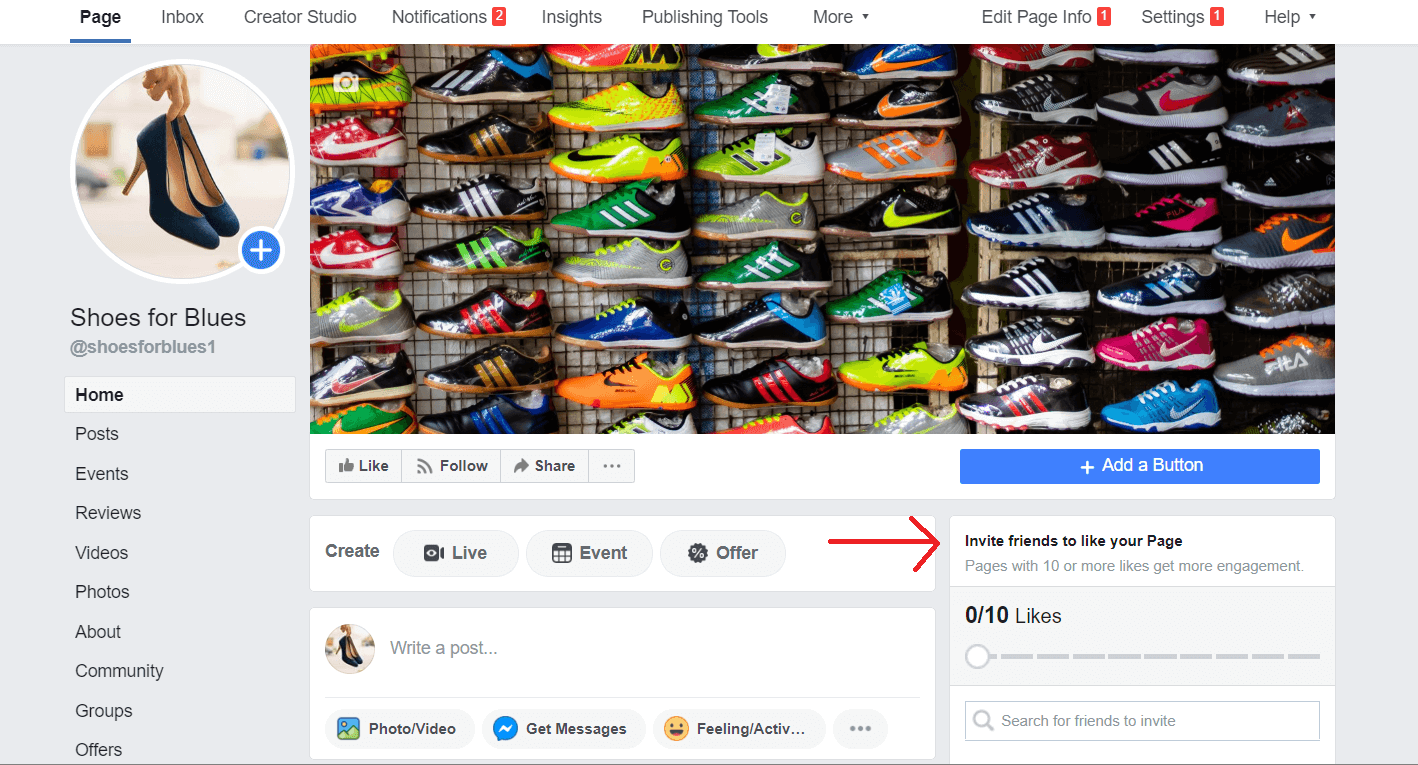
And voila! Your page template is ready. At this point, you should see something like this:
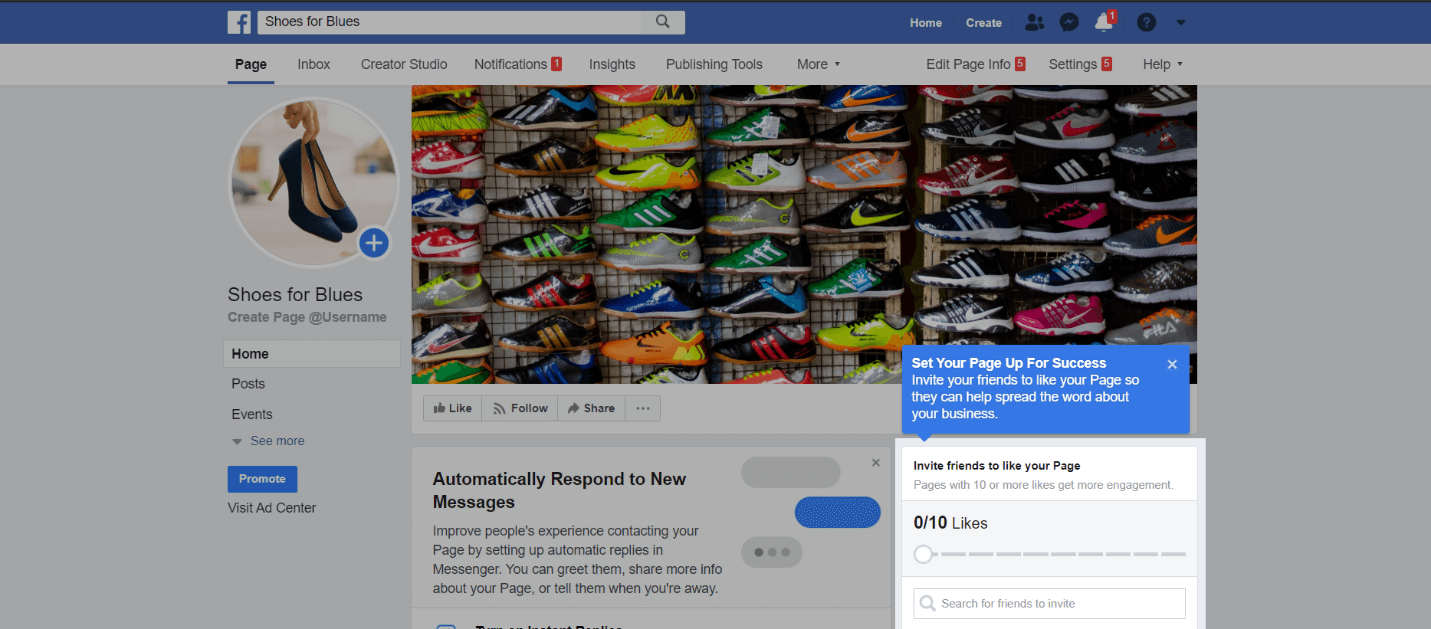
What Next?
If you look at the bottom right-hand corner of the page, you will see a pop-up that is highlighted.
This is the next logical step – although you can leave it for later if you wish.
This pop-up allows you to invite friends to like your page. It gives a list of some of your friends, as well as an option to see ALL your friends.
We’ll discuss this a little further into this blog post.
For now, let’s go back to what you need to do next.
2. Add more information about the business.
Ask yourself this: Why did you create a Facebook page?
To put up a few fancy pictures of your products and get the attention of your potential customers?
Well, yes, that too.
But your motivation behind setting up the fan page was for people to find out more about your business.
And that is what you want to work on once you have the page set up.
To do this, click on the Edit Page Info button in the menu bar near the top of the page.
You will be redirected to a page that will allow you to add important information to the page.
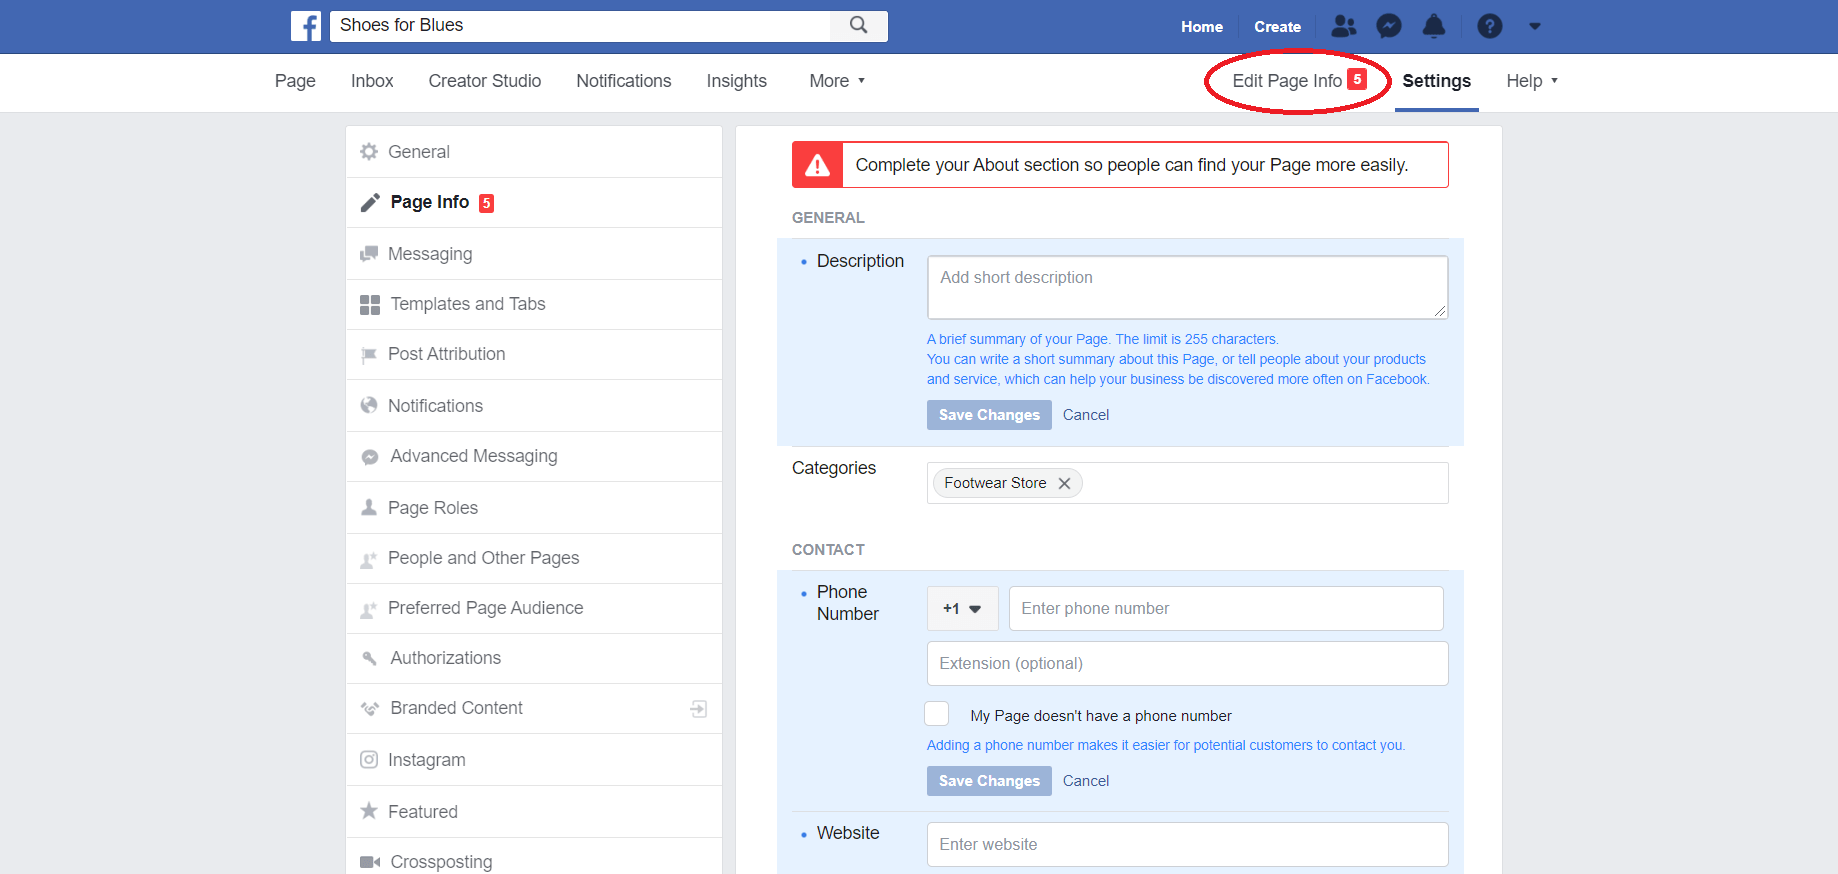
Let’s go through these points quickly so you know what you are dealing with.
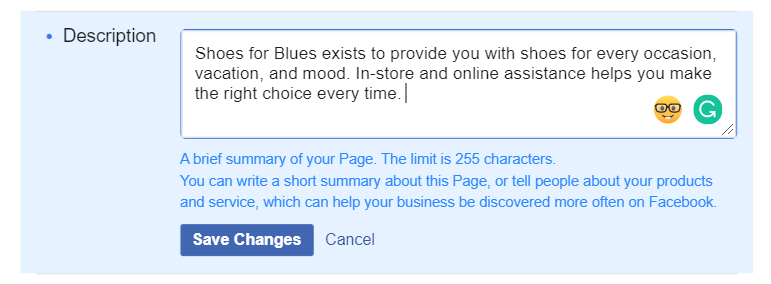
Description
This is a very small summary of the page (the limit is 255 characters so you can only write a few sentences). It should give the reader a gist of the business and what it is about.
Once you’ve added the description, click on the Save Changes button.
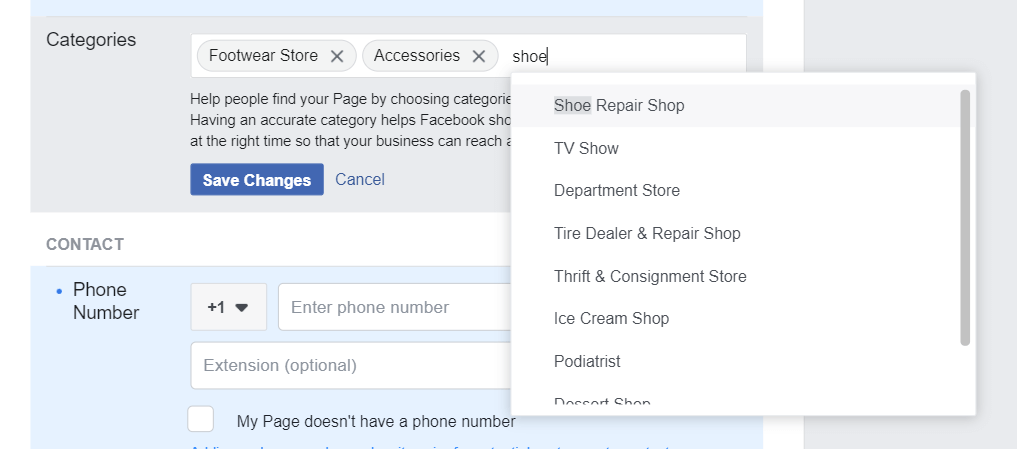
Category
You have already added ta category for your business. But you may be limiting the number of people that the page can reach by assigning only one category to the page.
In this section, you can add other categories too, so your page reaches a much wider audience that could benefit from your products or services.
The method to add the category is the same as we described above.
Once you are done, just click on the Save Changes button.
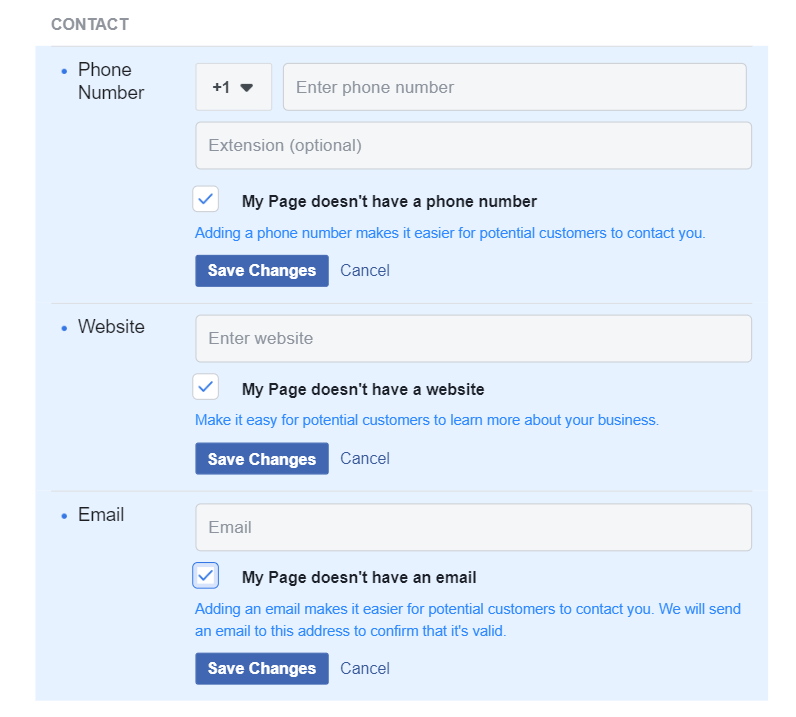
Contact Information
Next, you can add contact information for your business so that it is easy for customers and potential consumers to get in touch with you.
You have the option of adding your:
- Phone number
- Website
For each of these details, you can either add the specifics or you can tick a box saying you don’t have a phone number/email/website before you click on the Save Changes button.
In our case, that is just what we have done:
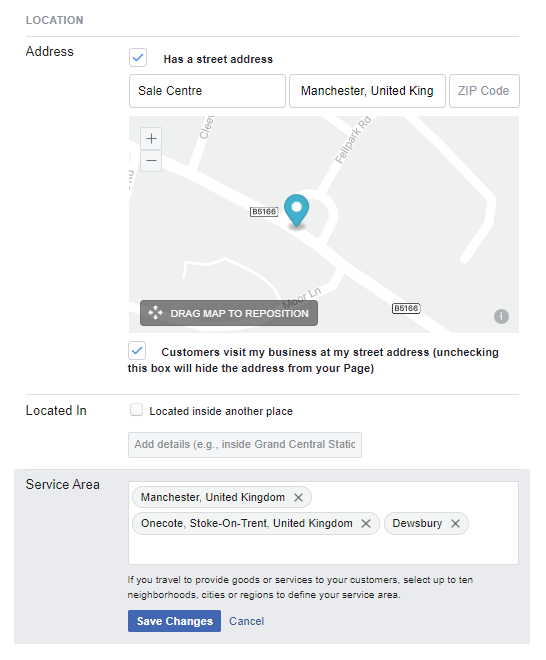
Location
This only applies if you have a physical store or office, the location of which you want to make public so people can reach you.
The location section has two components:
- The actual location of the physical presence
- The service areas
Firstly, you can specify the location on Google maps to help people locate you easily. You do have to tick the “Customers visit my business at my street address” box, otherwise this location will not be shown to the public.
You can also add specific details, for example, if your office is present inside another building.
In the Service Area section, you can add the areas you provide your services in.
In our example, we have added Manchester, Stoke-on-Trent, and Dewsbury to the Service Area, specifying that we deliver to these areas.
Once again, when you are done, you need to save all the changes.
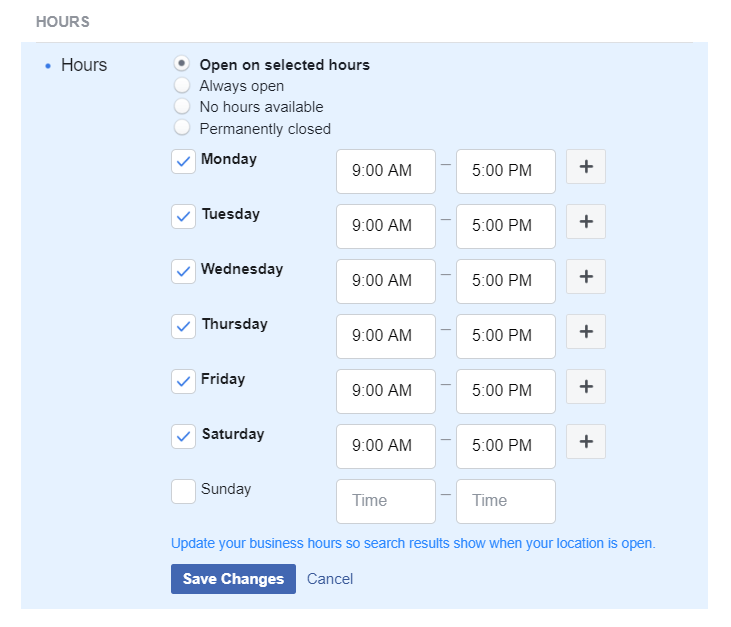
Hours
In this section, you need to specify when you are open – what time on what days.
You can choose the timings separately for each day of the week, or you can select a bulk option by ticking one of the boxes at the top of the section.
Make sure you are accurate with this. You don’t want to tell people on Facebook that you are open on Sundays, only to be closed when they turn up outside the shop on a Sunday.
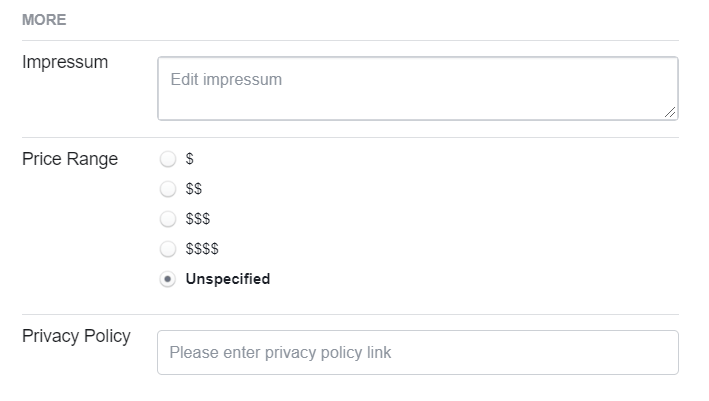
Additional information
The More section allows you to add the following information, if relevant, to the page:
- Impressum
- Price range
- Privacy policy
As always, click on Save Changes to make sure none of information or selections are lost.
About tab
The About tab is another place where you can add and edit information about the business.
Some of these details are the same as the ones we just discussed whereas others are different.
But before, let’s see how you get to the About section.
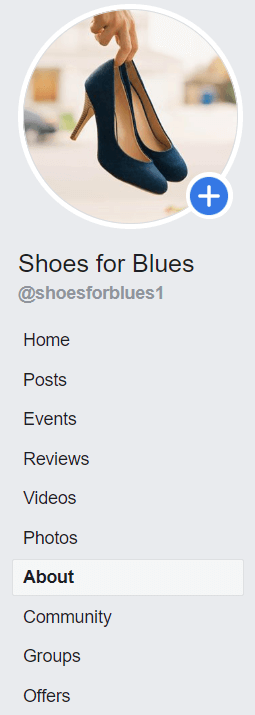
There are a number of options on the left-hand side of the page under your profile picture. Click on About from this list.
You will be redirected to a page that looks something like this:
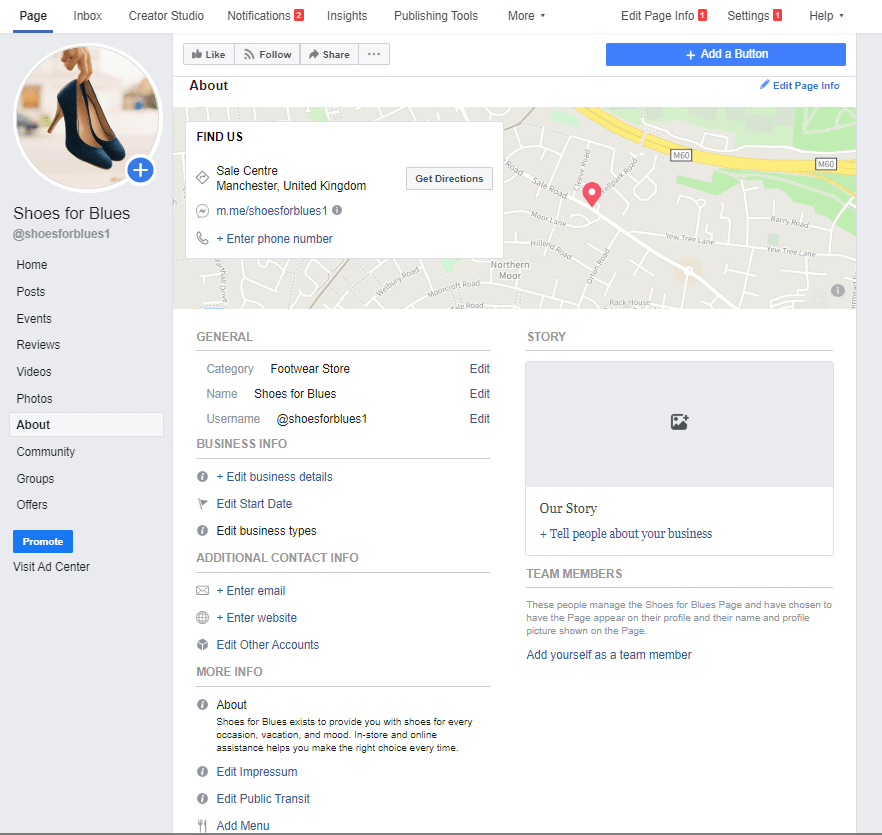
As you can see, a lot of the information that can be added here is the same as we have already discussed. Some things, though, are different.
Here are two examples:
You’ve given people an idea of what you’re about and what you do. But it is in this section that you truly get to share your story with your audience.
Tell them how you started out. What motivated you to get started. How you aim to fill a gap in their lives. What they can expect from you. The list can go on.
This, in short, is where you are going to convince potential consumers to not only like the page but become loyal customers. So make sure it is compelling.
Once you have added a Title and a picture to the actual story, you can click on the Publish button to share it with the world.
Team Members
You can add yourself, an employee, or any individual who manages the page (or more than one if you want) as a team member here.
This person will be visible to the general public as part of the team for your business.
This builds their trust and confidence in your brand, as well as gives them a point of contact if they want to reach out to someone directly.
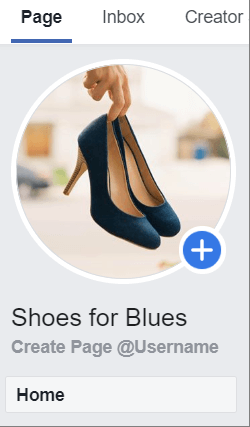
3. Come up with a Facebook page username.
A very important part of setting up a Facebook business page is to devise a username for the page.
The aim of the username is to help people search for and find you.
It is pretty obvious, then, that you want it to be as similar to your brand name as possible. Using your brand name as is may work perfectly. If you don’t think that’s your best bet, go for a slight variation but nothing major.
But how do you do it?
Under your profile picture on the page, click on Create Page @Username.
A pop-up will appear where you can add a username.
Note:
You won’t always be able to find the username you want. It is the same as creating an email ID for yourself – you have to go through at least a couple of variants, adding a dot here or a hyphen there to find one that isn’t already taken.
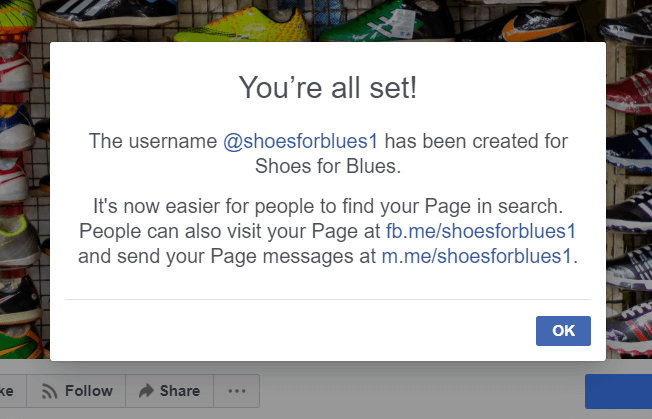
In our example, @shoesforblues was not available. Simply adding the digit “1” at the end of the username did the trick, though.
Create a username that reflects your brand persona/name and click on the Create Username button.
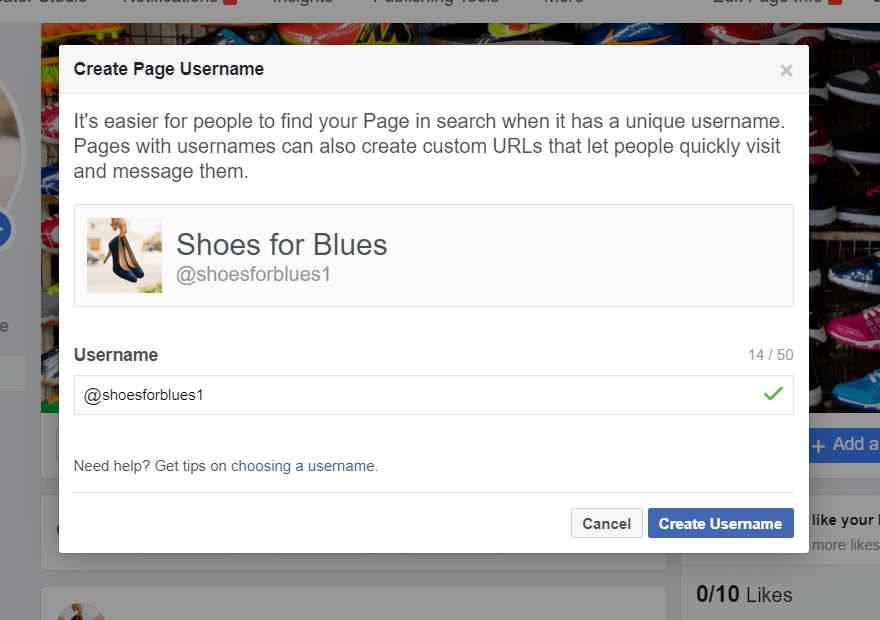
Once you’re done, Facebook will show you links using which people can connect with you.
4. Adjust the page settings to your preference.
The Facebook settings page is your next stop.
This is where you can play around with the settings of the Facebook page.
Simply click on the Facebook tab named Settings in the menu bar near the top of the page and you will be redirected to the Settings menu.
This is an elaborate menu with hundreds of major and minor things that you can adjust based on your requirements and desires.
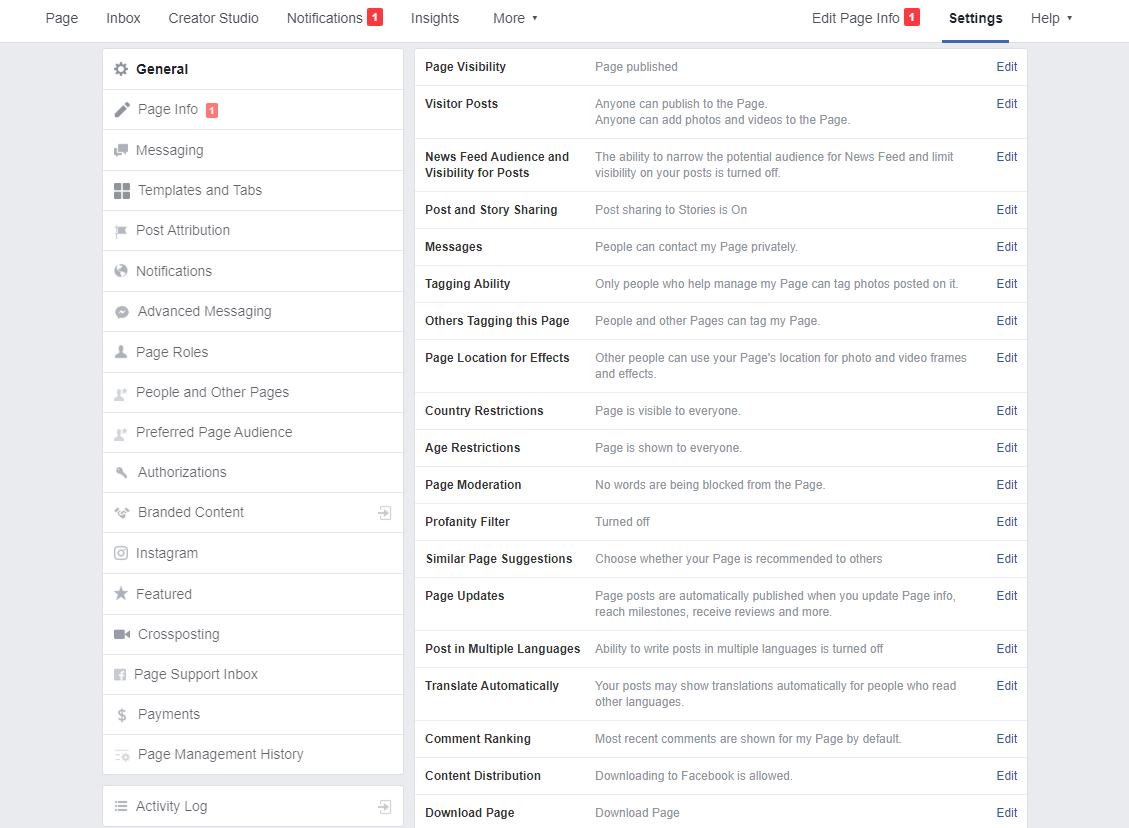
You can see all of the sub-sections of the Settings page on the left side of the page. Clicking on any of these sections will open up the details on the right side of the page.
While there are too many details for us to cover in this blog post, let us discuss some of the more important ones so you get an idea.
General
The General settings tab allows you to control a number of things such as post visibility, various restrictions, updates, content specifics, and more.
Notifications
The Notifications tab allows you to specify your preferences regarding when you choose to be notified about certain activities on the page and when you can do without.
Page roles
Page roles allows you to assign new roles (you can choose from Admin, Editor, Moderator, Advertiser, and Analyst) when you want someone to help you run the page. You can also modify existing roles.
From this tab, you can link the Facebook page to Instagram without a hassle. When you link Instagram to your Facebook page, you make sure that you reach more people.
Page Management History
The Page Management History tab lets you view all the actions carried out on the page by anyone who has been assigned a role.
There are many other settings you can control from this tab, such as page moderation, Facebook page messenger settings, and much more. You can play around with the detailed settings once you have the basics in place.
5. Invite people to Like the page.
I want people to open my Facebook page and interact with my content.
That’s a given.
But before that, I want to tell people that the page exists and invite them to like the page.
Facebook gives you the option to do that on the right-hand side of the page.
Invite friends you would want to like the page.
Remember: The more people that like your page and are a part of your community, the greater the chances you can manage to increase Facebook likes overall.
So encourage as many people as you can to like the page.
Once you’ve built somewhat of an audience for the page from within your own circle, you can begin to promote the Facebook page to strangers through immaculate content strategies and other means.
6. Don’t hesitate to reach out for help!
When you create a Facebook page for the first time, there will be many instances where you will have questions that will need answers.
And no guide will be able to answer these very specific questions.
That is when the Help tab comes into the picture.
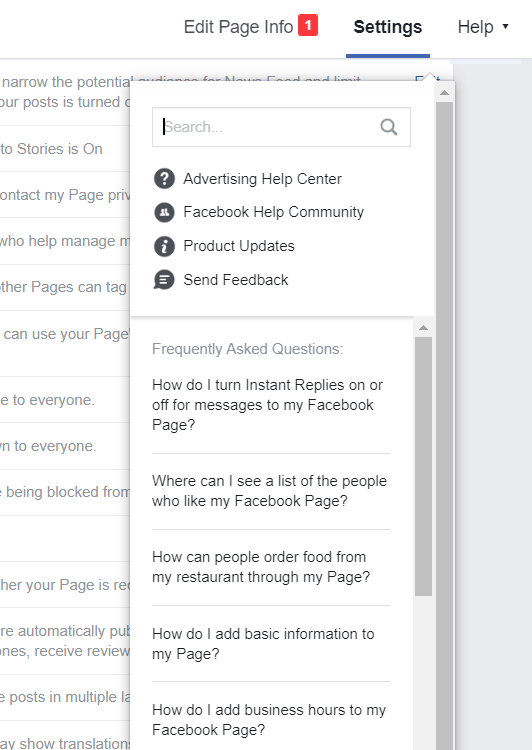
Simply click on Help in the menu near the top of the page. A drop-down menu will appear, which is a help center in the truest sense.
The Help Center will provide you with resources and links that should help you solve any problems you may be having.
It also gives you a list of frequently asked questions so you may get specific answers without having to dig too deep.
In any case, never hesitate to reach out for help.
If you have a friend or colleague who runs a Facebook page, ask them for some assistance over coffee. If not, the Facebook Help center is always available to give you Facebook business page tips.
Now, before we conclude this post, let’s quickly see the most frequently asked important questions about the topic:
Most Frequent Queries
1- Is a Facebook business page free?
Facebook has turned into a profitable marketplace for all kinds of businesses. Creating a Facebook business page, however, is still free. Irrespective of whether you have a hefty Facebook advertising budget or only rely on organic marketing, your Facebook page creation would always be free.
2- How do I create a Facebook account for a business?
Here’s a 7-step breakdown of how to create a Facebook account for any business:
- Sign up on facebook.com/pages/create and pick your category.
- Add your business or brand details, including name, address, and phone number, etc.
- Upload the profile picture for your business. The more closely resonating this image is to your business – preferably the logo – the better.
- Add a cover photo/banner that reflects your business.
- Create a username that helps your prospects find you with ease.
- Add other information in the *Edit page info* section, including:
-
- Description
- Page category
- Contact information
- Location
- Hours
- About
- Additional information
- Facebook story
- Adjust page settings to your preferences, including:
-
- General
- Messaging
- Notifications
- Page roles
- Authorizations
- Cross-posting
- Page management history, etc.
3- Can you have 2 business manager accounts?
Yes, according to Facebook terms, you can have up to two business manager accounts registered on one email id.
4- How many business manager accounts can I have?
2 is the greatest number you can have for business mangers in your name (on one email id).
Therefore, when you need more accounts, you’d need access to a business manager account registered on someone else’s id from your organization.
5- How do you add a business manager to an existing Facebook page?
Often confused with the opposite case, you don’t add a business manager to a Facebook page. Here’s how you can add an existing Facebook page to business manager:
- Get admin access to the business page you want to add to the business manager.
- Acquire admin access to the business manager in which you want to add the business page.
- Go to your business settings at business.facebook.com/settings/ (and pick your business manager to which you want to add a Facebook business page, in case of more than one business manager accounts).
- In the settings tab, click on the “Pages” option under “Accounts.”
- Click on the “Add” button and pick the “Add a page” option from the options bar that drops down.
-
- You may also choose “request access to a page” to add a page to which you don’t have access yet.
- If the page you want to add to the business manager doesn’t exist yet, you can create it right here, picking the “create a new page” option.
- Add your page name or the URL of your page to the business manager and click on the “Add page.” As long as you are the admin of the page, your request would be approved right away.
6- Why are Facebook business pages important?
First off, you need a point of contact with your potential customers and your representation. Your customers and prospects hang out on Facebook, therefore that’s where you need to be to stay in their minds. That’s how they’d give you a consideration when they require your services or products. But there are other benefits of having a Facebook page as well, such as:
- Owning a Facebook business page gives you insights into your target market.
- Additionally, besides creating a physical name and place for your prospects to follow, it helps you create and nurture a community.
- Similarly, having a Facebook business page automatically boosts your SEO.
Wrapping it up
Setting up a Facebook page for your business isn’t the end goal – it is the beginning of a beautiful, tough, taxing, rewarding journey that can get you places.
But it all begins when you create a Facebook page in the best way possible and truly use it to connect with and assist your audience.
This guide will help you do just that!
As always, if you have any questions, leave them in the comments section below and we will get back to you.
Happy creating!
Oh and before we leave, once you have set up a Facebook page, we have a lot of resources that can help you win at Facebook marketing.
Here is a list of a few – you can find the rest on our blog!
Starting a New Company? How to Market Online for FREE
A Guide to Facebook Demographics, Age Groups & Age Ranges
7 Facebook Marketing Tactics You Should Know
Top 21 Facebook Marketing Mistakes [That Might Be Draining Your Business]
Creating Facebook Ad Accounts & getting them to work


Leave a Comment